Sunday, November 28, 2010
Saturday, September 4, 2010
Command line scanner in the OfficeScan client
Here are the options that you can use:
| Option | Function |
| /? | Displays the “Help” |
| /S | Scan all files in specified directory and all subdirectories |
| /C | Clean virus-infected files without any prompting |
| /D | Delete virus-infected files without any prompting |
| /B | Scan boot/partition area only |
| /P | Scan hard disk partition only |
| /NM | Do not scan memory |
| /NB | Do not scan boot sector/partition are of disk |
| /NC | Scan only, do not take any action on virus files |
| /BK[+|-] | Clean virus-infected files backup switch |
| /P=path | Specify virus pattern path |
| /P=file[;file...] | Specify virus pattern file(s) |
| /LAPPEND | Open LOG file with append mode |
| /LR[=file] | Write standard report to the specified file Default name “report.log” |
| /LD[=file] | Write detected files to the specified file Default name “detect.log” |
| /LU[=file] | Write undetected files to the specified file Default name “undetect.log” |
| /LC[=file] | Write clean results to the specified file Default name “clean.log” |
| /LCF[=file] | Write clean fail results to the specified file Default name “cfail.log” |
| /VER | Display the version information |
| /I | Display more information about scanning results |
| /NV | Only display the files without virus infection |
| /CLEANALL | Scan and clean the file until no virus is found |
| /HOSPITAL=path - | Move the virus files to specific directory |
| /DISKIMAGE[=drive] | Scan disk images (with or without restoring) |
| /NZ | Do not scan zip files (e.g. PKZIP, ARJ) |
| /NLITE | Do not scan pklite files (e.g. PKLITE, LZEXE) |
| /NMICE | Do not scan some softmice files |
| /NMACRO | Do not scan macro files (e.g. DOC, XLS) |
| /NJAVA | Do not scan java files |
| /NSCRIPT | Do not scan script files |
| /NGENERIC | Do not use generic scan |
| /ZIPACTION | Enable zip virus action in callback |
| /ZIPBREAK | Enable zip virus break in callback |
| /VSCHAR=n | Set character environment type from “n” (1: Traditional Chinese; 2: Japanese) |
| /VSZIP=n | Set decompress layer |
| /ACTIVEACTION=n | Enable Active Action and se the ProjectID |
| /VSTEMP=path | Set the default temporary path |
| /VSEXT=file | Set/Add process extensions from file |
| /VSEXEXT=file | Set/Add exclude process extensions from file |
| /VIRUSNAME | List all detectable virus name (n: # to read) |
| /UNICODESCAN | Scanning and cleaning with Unicode files |
| /Q | Disable all output message |
| /RENAME | Rename virus-infected files without any prompting |
Product:
OfficeScan - 10.0, 7.0, 7.3, 8.0
Operating System:
Windows - 2000 Server Series SP4, 2003, 2003 Server Series SP1, Server 2008 Enterprise, Server 2008 Standard, Vista, XP
| Solution: Yes, the OfficeScan client has a command line scanner called VScanTM. You can run this from the OfficeScan client program file location: | |
|
| |
|
| vscanwin32 [/|-option] Drive:[path[filename|@script]] [Drive:[path[filename]] |
Tuesday, August 10, 2010
Solaris Port Numbers
Solaris Port Numbers
This page lists the common port numbers for a Solaris server.
| Service | Port Number | TCP/UDP |
| echo | 7 | tcp/udp |
| ftp-data | 20 | tcp |
| ftp | 21 | tcp |
| telnet | 23 | tcp |
| smtp | 25 | tcp |
| time | 37 | tcp/udp |
| name | 42 | udp |
| tftp | 69 | udp |
| pop3 | 110 | tcp |
| nntp | 119 | tcp |
| ntp | 123 | tcp/udp |
| nfsd | 2049 | tcp/udp |
| lockd | 4045 | tcp/udp |
Friday, July 23, 2010
Storage RAID Data Collection(Auto Dump)
The RAID "Auto Dump" Facility is required for most problems that relate to HDS RAID subsystems.
 A dump can only be initiated from the subsystem SVP, and thus most commonly it requires action from an HDS engineer.
This function is a procedure that merges the separate DUMP and FDCOPY functions into one operation, and provides a single compressed file available for transfer from the SVP. The default location of this file is:
- C:\DKC200\TMP\hdcp.lzh (for 9900, 9900V)
- C:\DKC200\TMP\hdcp.tgz (for USP, NSC, USP-V, USP-VM)
For instructions on how to perform an Auto Dump on a RAID subsystem, refer to the SVP section --> 2. Function of the SVP of the Maintenance Manual.
Note A common mistake is to collect the file called dump.lzh or dump.tgz. This file is included in hdcp.lzh or hdcp.tgz and cannot be used alone without the logs and config info. Always collect hdcp.lzh or hdcp.tgz
Types of Auto Dump:
- RAPID
Gathers logs, SVP operation history, configuration information. NOT collected: Dump data (Processor, ABEND, WCHK1) and monitor data. This type should only be collected when urgent initial analysis is required and/or slow upload connection is available. This type is typically used for Backend (Hard Disk) related errors and for system healthchecks. - NORMAL
Performs and collects dumps (all microprocessors, ABEND, WCHK1), in addition to files gathered by RAPID. Monitor data is not collected. This type should be collected by default when no instruction has been given and the problem types refered to in "3. DETAIL" below do not apply. - DETAIL
Gathers monitor data, in addition to information gathered by RAPID and NORMAL. This type should be collected when there is some suspicion that the problem is related to performance, subsystem workload, sidefile or HUR journal overflow.
Note: If the performance problem is happening when the dump is about to be taken, then if at all possible set the System Option MODE 31=ON, wait 5 minutes, then take the Detailed dump. This could save a lot of time later on. Turn MODE 31 OFF when you have taken the dump.
Other Autodump types are available with USP,NSC,USP-V,USP-VM and should only be collected if instructed by GSC.
IMPORTANT
Before performing dump procedure, check maintenance STATUS and VERSION.
In the case of Mainframe subsystem, also display Main Frame Paths (USP, NSC, USP-V, USP-VM) or Physical Paths (9900, 990V)
Special Instructions when a DETAIL dump is to be collected for Performance Problem troubleshooting:
- For 9900 and 9900V, be sure to start the SVP Monitor (refer to Monitoring function in SVP MM pages). All items of data are collected internally, regardless of display settings. Choose at least ONE display setting. Choose an interval appropriate to the error condition (ex: "60 sec" interval can collect data for 7 hour period). This step is not required for USP, NSC55, USP-V or USP-VM
- Turn on System Mode 31 before the testing starts for the problem you are trying to troubleshoot. Mode 31 captures critical trace data related to Host IO performance. Its buffers can wrap after just 60 seconds on a busy port. Thus make sure that the DETAIL dump is taken before the testing is complete - and at a time the problem is being experienced.
- Open maintenance STATUS and VERSION before starting the dump.
- If MODE 31 has been turned on, remember to turn it off after the DETAIL DUMP completes. MODE 31 can have a performance impact on some workload types and should not be left on unless specifically requested by GSC.
Disconnect-End a users session via Terminal Services Manager
Disconnect-End a user’s session via Terminal Services Manager
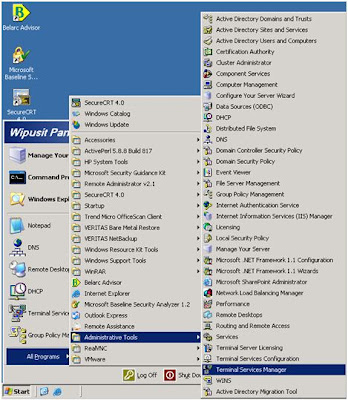
To start Terminal Services Manager
- Click “Start”
- Click “Administrative Tools”
- Then click “Terminal Services Manager”

Disconnect from a session:
To disconnect from a session, click “Users” or “Sessions” tab on the right pane, right click the server’s name of the session you want to disconnect from, and then click “Disconnect”.
The administrator can end a user’s terminal session for various reasons. To log the user off from the terminal session, click “Users” tab on the right pane, right click the server name of the user’s session need to be logged off, and then click “log off”. Click “OK” whenever you are promoted to confirm the action.


